Biometric Method
The Biometric content area enables administrators to establish, configure, assign and maintain biometrics so users can authenticate to a system using fingerprint-based based biometric authentication.

There are four Biometric content areas.
Content area | Description |
|---|---|
Profile List | Profile List summarizes the configured Contactless Profiles, including the configured PIN policy, card behavior options, and the settings for whether a PIN is required. |
PIN Policies | The PIN Policies content area provides the ability for organizations to establish PIN usage policies and selection criteria for securing contactless cards protected with a PIN. |
New Profile | The New Profile content area provides the ability for organizations to create custom profiles that can pair PIN policy with Sets and assigned to users. |
New PIN Policy | New PIN PolicyThe New PIN Policy provides the ability to create custom PIN policies for contactless card authentication. |
Biometric - Profile List
By default, RapidIdentity Server has a single profile for biometrics.
The Default profile contains a default PIN Policy with these settings.
Setting | Value |
|---|---|
Attempts before PIN becomes blocked | 3 |
Minimum PIN Length | 4 |
Repeated character limit | 3 |
Consecutive character limit | 3 |
Number of fingers user is required to enroll | 3 |
Require PIN | User must provide PIN in addition to fingerprint to login but not to unlock a locked session. |
Secure Logon Password (required) | No. If set to “Yes”, a user’s password will be randomized and unknown to the user upon enrollment. |
Administrators can remove a profile by clicking Delete or edit a profile by clicking Edit.
Biometric - Edit Profile
After updating the profile, click Save or Discard to cancel.

Biometric - PIN Policies
PIN Policies enables administrators to create custom PIN policies and edit out-of-the-box PIN policies.

Initially, there are four PIN policies with varying degrees of security and the default PIN Policy is based on best practices.
Each PIN Policy can be edited or administrators can create new PIN policies and each PIN policy is assigned to a Profile that can then be assigned to a Set. Sets are then assigned to users.
PIN Policies can be removed by clicking Delete or edited by clicking Edit.
Biometric - Edit PIN Policy
To edit a PIN Policy, click Edit.
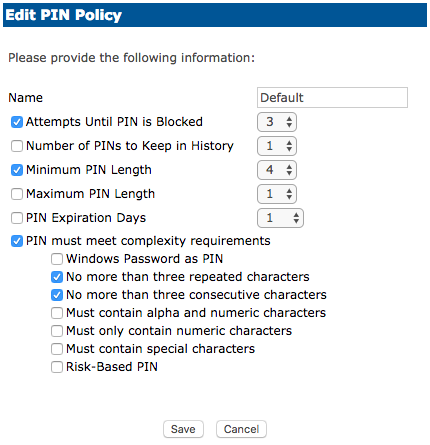
After updating the policy criteria, click Save or Cancel to discard.
Field | Description |
|---|---|
Attempts until PIN is Blocked | This number represents how many incorrect attempts can be made before the RapidIdentity Windows Client will block the user’s login process. |
Number of PINs to Keep in History | This number determines the number of PINs we would remember before allowing those previous PINs to repeat. |
Minimum/Maximum PIN Length | Determines the length of the PIN that is used on enrollment and logging into the system. |
PIN Expiration Days | Determines how long the registered PIN will last before expiring. |
PIN must meet complexity requirements | Determines how complex the PIN must be. |
Use Windows Password as PIN | The user’s Active Directory password will be used as PIN. |
No more than three repeated characters | PIN cannot have three repeated characters. (Example: 111, 444) |
No more than three consecutive characters | PIN cannot have consecutive characters. (Example: 123, 456) |
Must contain alpha and numeric characters | PIN must have both a letter and number. (Example: A1B, C2D) |
Must only contain numeric characters | PIN can only have numbers. (Example: 159, 753) |
Must contain special characters | PIN must have a special character. (Example: !23, @34) |
Risk-Based PIN | Risk-based authentication will prompt when the RapidIdentity Client detects a different type of authentication upon login. |
Biometric - New Profile
In order to assign a new Profile to a Set, administrators must first create the new Profile.
Follow these 3 steps to create a new Profile:
Click New Profile.
Enter a Name and Description and modify the criteria as needed.
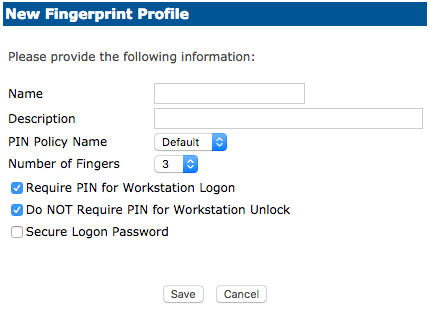
Choose Require a PIN for Workstation Logon if the user is to be prompted for a password when presenting their authentication method.
Choose Do NOT Require PIN for Workstation Unlock when the system is locked and the user presents their authentication method. The user will NOT be asked to enter a password.
Choose Secure Logon Password has a default set to No. If this is enabled, when the user presents their finger to the reader the user’s password will be randomized and unknown to the user.
Click Save or Cancel to discard.
Biometric - New PIN Policy
To create a new PIN Policy, click New PIN Policy.
Name the new policy and adjust the criteria as necessary. When complete, click Save or Cancel to discard.
Field | Description |
|---|---|
Attempts until PIN is Blocked | This number represents how many incorrect attempts can be made before the RapidIdentity Windows Client will block the user’s login process. |
Number of PINs to Keep in History | This number determines the number of PINs we would remember before allowing those previous PINs to repeat. |
Minimum/Maximum PIN Length | Determines the length of the PIN that is used on enrollment and logging into the system. |
PIN Expiration Days | Determines how long the registered PIN will last before expiring. |
PIN must meet complexity requirements | Determines how complex the PIN must be. |
Use Windows Password as PIN | The user’s Active Directory password will be used as PIN. |
No more than three repeated characters | PIN cannot have three repeated characters. (Example: 111, 444) |
No more than three consecutive characters | PIN cannot have consecutive characters. (Example: 123, 456) |
Must contain alpha and numeric characters | PIN must have both a letter and number. (Example: A1B, C2D) |
Must only contain numeric characters | PIN can only have numbers. (Example: 159, 753) |
Must contain special characters | PIN must have a special character. (Example: !23, @34) |
Risk-Based PIN | RBA will prompt when the RapidIdentity Windows Client detects a different type of authentication upon login. |
Special Configuration for Biometric Authentication
Required Biometric Configuration
Fingerprint biometric authentication requires additional configuration beyond RapidIdentity MFA Server Methods, Sets, and Profiles, and beyond RapidIdentity Windows Client enrollment.
The specific configuration depends on the RapidIdentity MFA implementation, and the additional configuration can include updating the Windows Group Policy Object (GPO), RapidIdentity MFA Server Side settings, and the Standalone RapidIdentity Windows Client.
Advisory
Administrators should also consider the biometric authentication use case relative to the supported RapidIdentity MFA Hardware and the hardware-software combination specific to their environment to ensure compatibility and a high probability of authenticating successfully.
Windows GPO Updates
The Windows GPO settings apply to a standalone machine, however, administrators can choose to push these GPO settings with the Domain Group Policy by using the Group Policy Management snap-in on a Domain Controller.
To update the Windows GPO settings, follow these 5 steps:
Navigate to the Start Menu and type gpedit.msc. Press Enter.
Navigate to Computer Configuration | Administrative Templates | Windows Components | Biometrics.
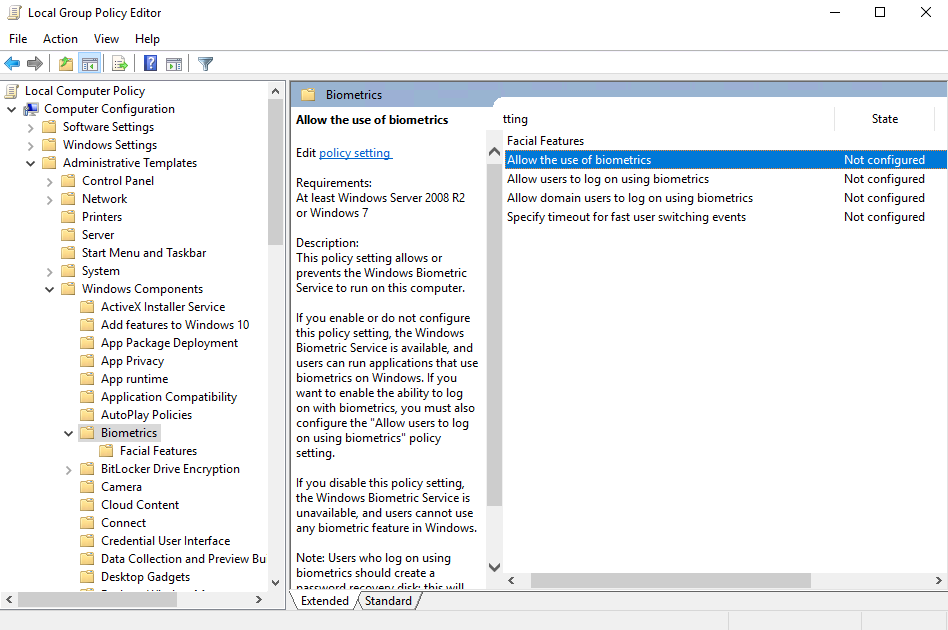
Right-click Allow the use of biometrics and select Edit.
Select Enabled and click OK.
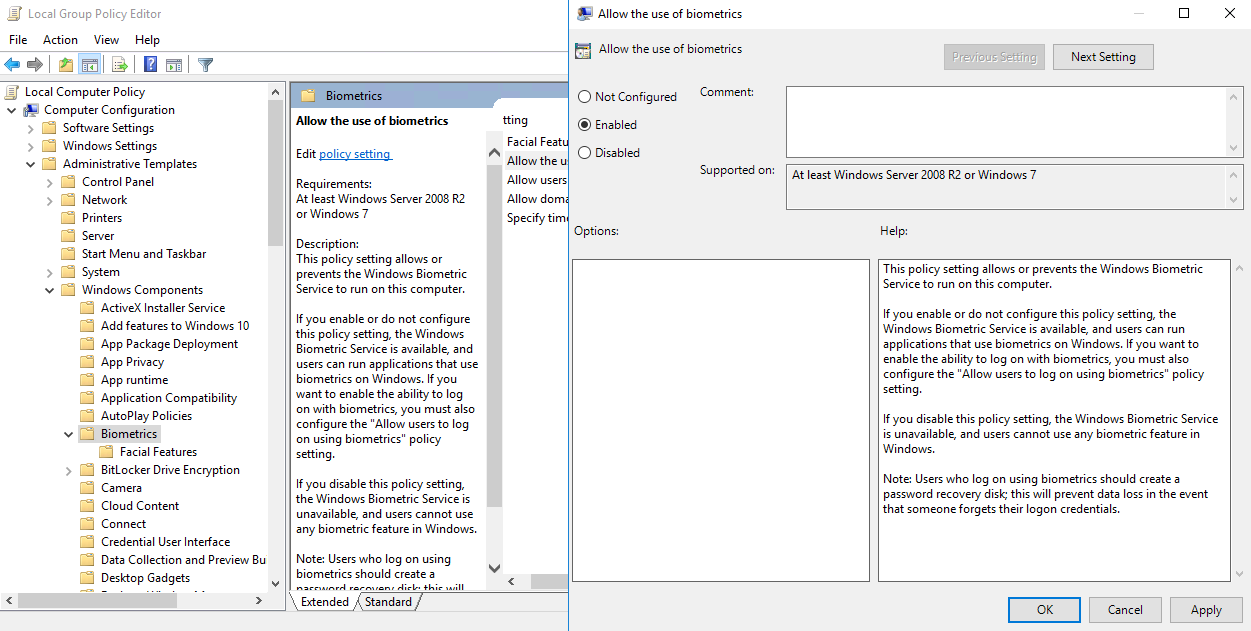
Repeat this process for Allow users to logon using biometrics, but select Disabled.
MFA Server updates
When RapidIdentity MFA Server and RapidIdentity Windows Client are configured to work together, it is necessary to update the MFA Server to facilitate biometric authentication with these 5 steps:
Navigate to the Administrator’s Portal and access the Policies tab.
Enter the corresponding DN or machine name(s) for which RapidIdentity Windows Client is installed.
Define the policy and click Edit.
Navigate to the Hardware tab, check Bio Device, and select WBF from the drop-down list.
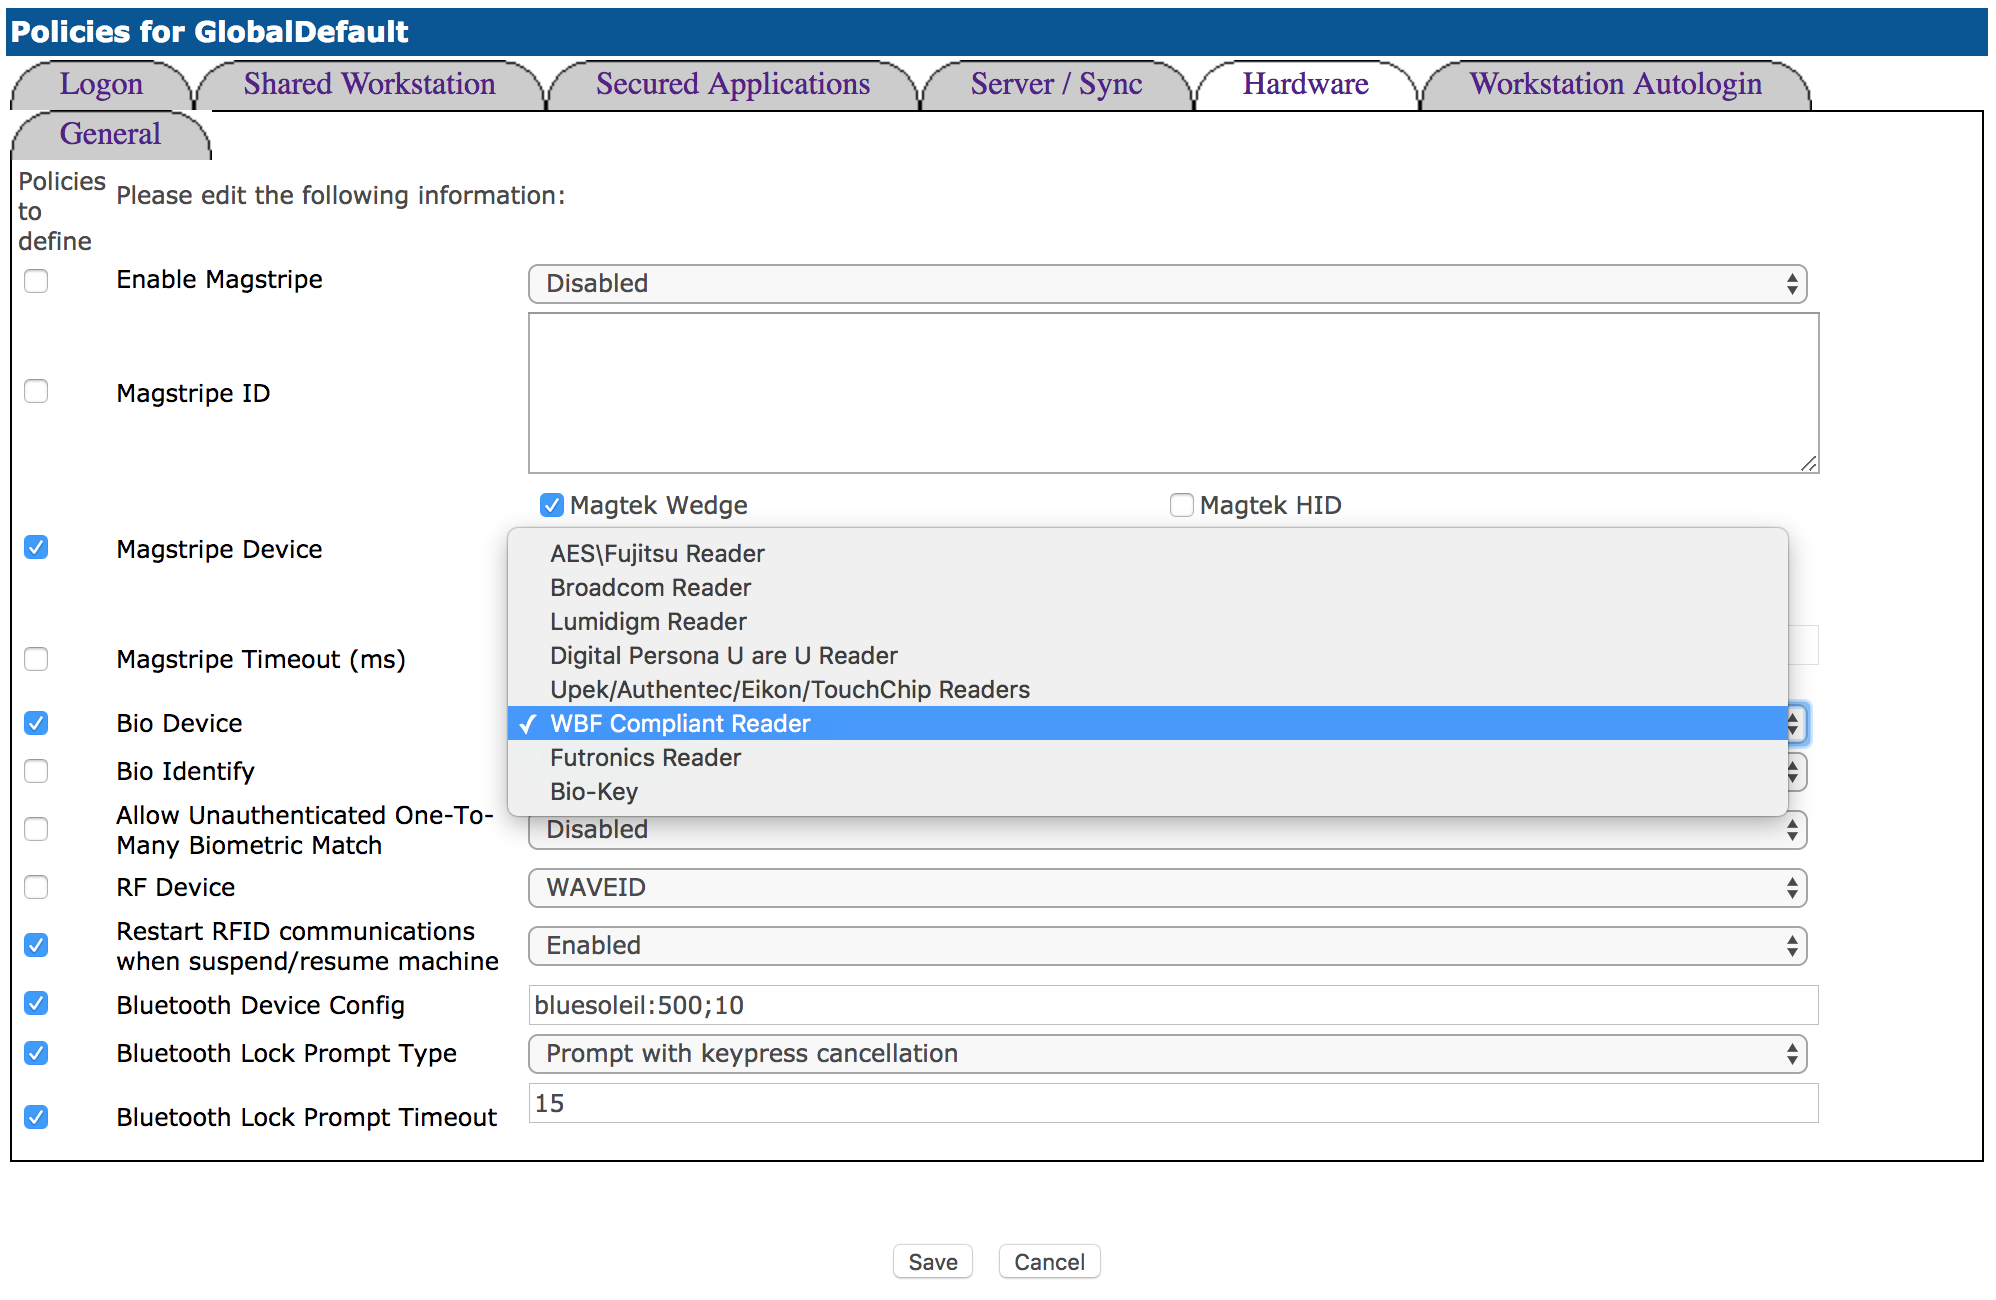
Click Save.
Standalone Client updates
To enable biometric authentication with RapidIdentity Windows Client in standalone mode, follow these steps:
On the machine in which RapidIdentity Windows Client is installed, authenticate as an administrator and access the Registry Editor (i.e. regedit).
Navigate to HKEY_Local_Machine\Software\Foray.
Create a new String with the Value name BioDevice and the Value data wbf.
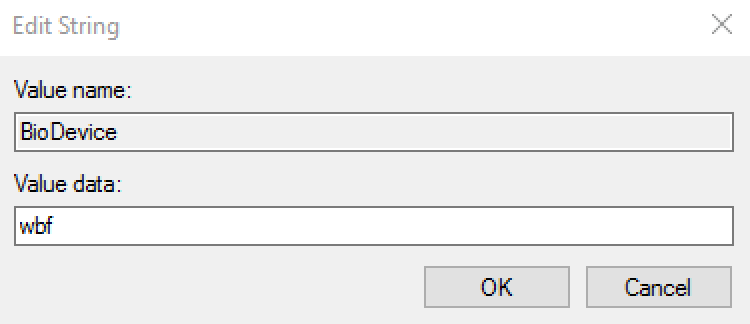
Click OK and exit the Registry Editor.
Context
RapidIdentity MFA Server pushes this registry value to RapidIdentity Windows Client when the Client is not configured in Standalone mode, as illustrated in the preceding configuration.